Room - SleepQualityTracker app
This is the toy app for Lesson 6 of the Android App Development in Kotlin course on Udacity.
SleepQualityTracker
The SleepQualityTracker app is a demo app that helps you collect information about your sleep.
- Start time
- End time
- Quality
- Time slept
This app demonstrates the following views and techniques:
- Room database
- DAO
- Coroutines
It also uses and builds on the following techniques from previous lessons:
- Transformation map
- Data Binding in XML files
- ViewModel Factory
- Using Backing Properties to protect MutableLiveData
- Observable state LiveData variables to trigger navigation
Screenshots
How to use this repo while taking the course
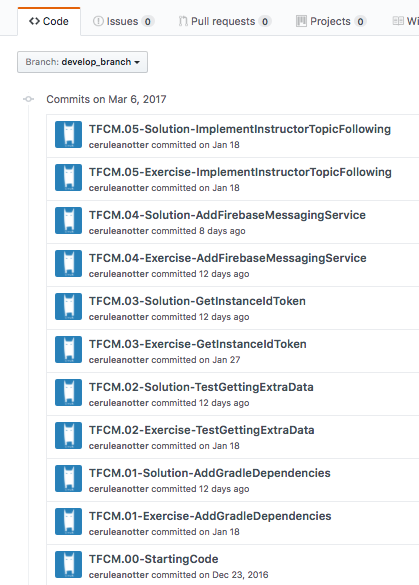
Each code repository in this class has a chain of commits that looks like this:
These commits show every step you'll take to create the app. Each commit contains instructions for completing the that step.
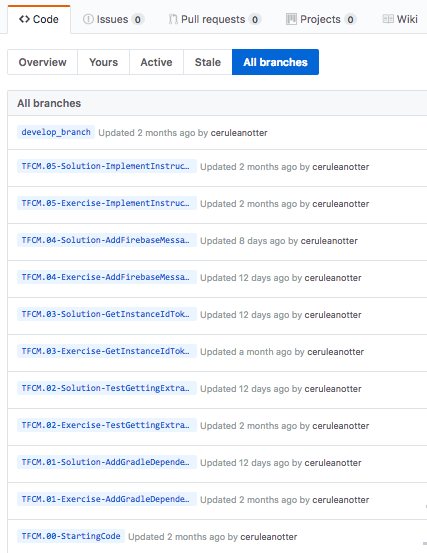
Each commit also has a branch associated with it of the same name as the commit message, as seen below:

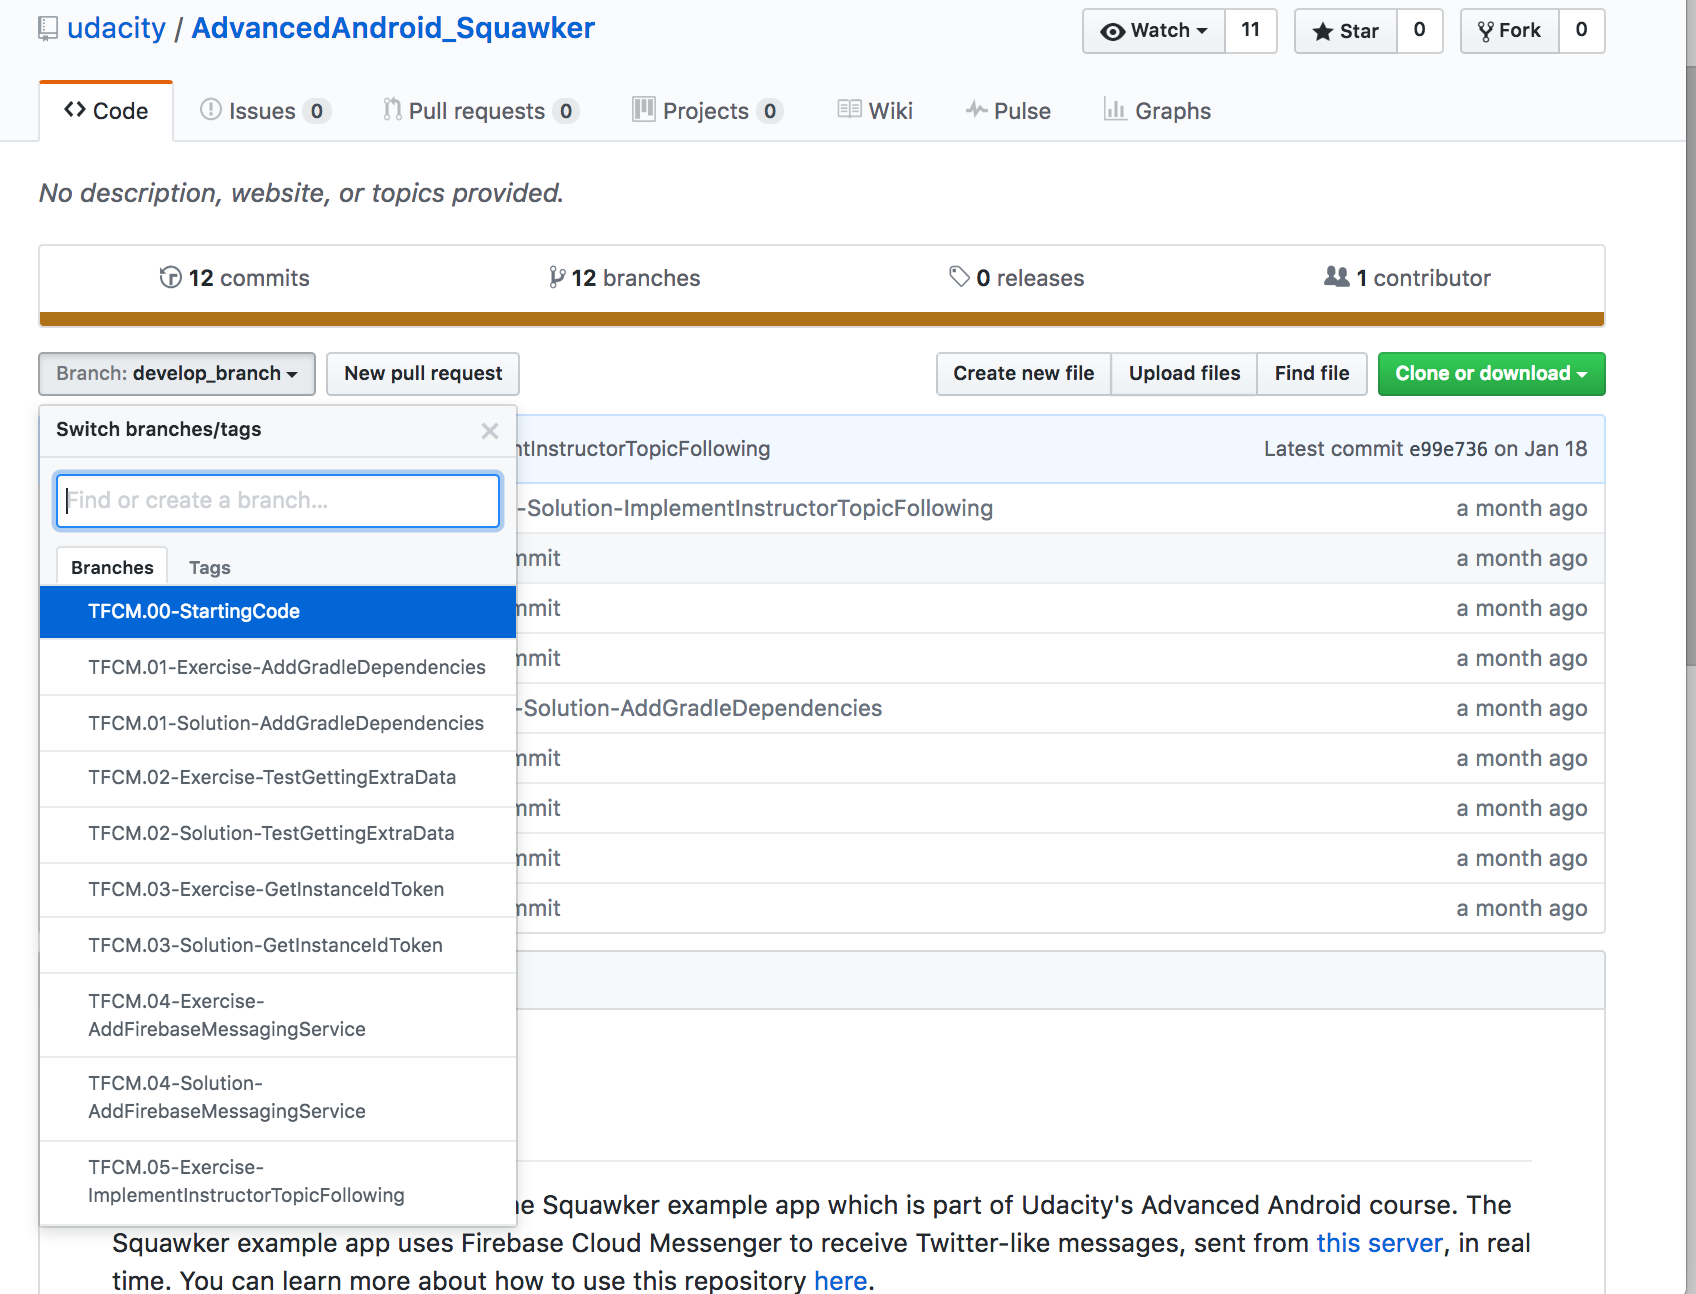
The branches are also accessible from the drop-down in the "Code" tab.
Working with the Course Code
Here are the basic steps for working with and completing exercises in the repo.
The basic steps are:
- Clone the repo.
- Check out the branch corresponding to the step you want to attempt.
- Find and complete the TODOs.
- Optionally commit your code changes.
- Compare your code with the solution.
- Repeat steps 2-5 until you've gone trough all the steps to complete the toy app.
Step 1: Clone the repo
As you go through the course, you'll be instructed to clone the different exercise repositories, so you don't need to set these up now. You can clone a repository from github in a folder of your choice with the command:
git clone https://github.com/udacity/REPOSITORY_NAME.git
Step 2: Check out the step branch
As you go through different steps in the code, you'll be told which step you're on, as well as a link to the corresponding branch.
You'll want to check out the branch associated with that step. The command to check out a branch would be:
git checkout BRANCH_NAME
Step 3: Find and complete the TODOs
Once you've checked out the branch, you'll have the code in the exact state you need. You'll even have TODOs, which are special comments that tell you all the steps you need to complete the exercise. You can easily navigate to all the TODOs using Android Studio's TODO tool. To open the TODO tool, click the button at the bottom of the screen that says TODO. This will display a list of all comments with TODO in the project.
We've numbered the TODO steps so you can do them in order:
Step 4: Commit your code changes
After You've completed the TODOs, you can optionally commit your changes. This will allow you to see the code you wrote whenever you return to the branch. The following git code will add and save all your changes.
git add .
git commit -m "Your commit message"
Step 5: Compare with the solution
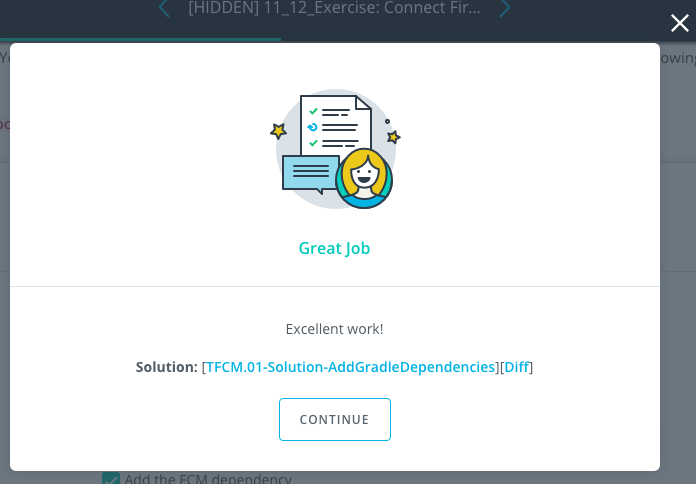
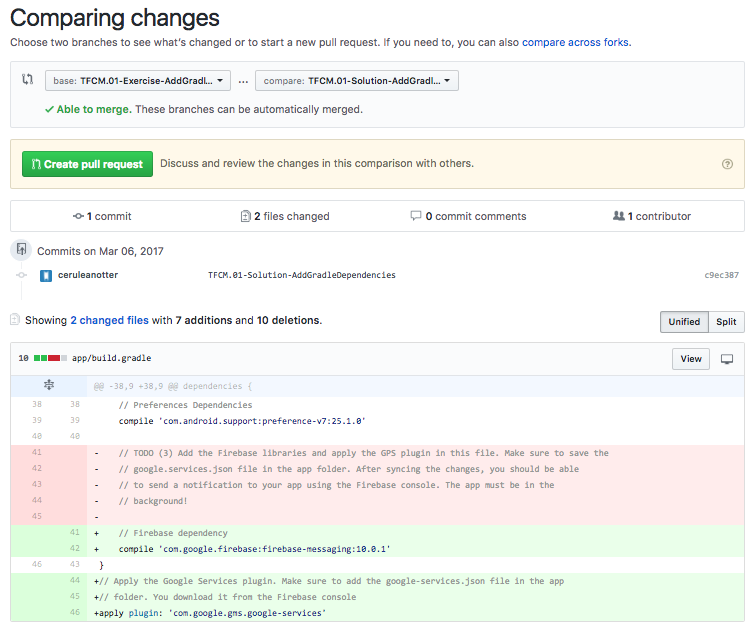
Most exercises will have a list of steps for you to check off in the classroom. Once you've checked these off, you'll see a pop up window with a link to the solution code. Note the Diff link:
The Diff link will take you to a Github diff as seen below:
All of the code that was added in the solution is in green, and the removed code (which will usually be the TODO comments) is in red.
You can also compare your code locally with the branch of the following step.
Report Issues
Notice any issues with a repository? Please file a github issue in the repository.
Creating the SleepNight Entity
- In the database package, find and open the SleepNight.kt file.
- Create the SleepNight data class with parameters for an ID, start time and end time in milliseconds, and a numerical sleep quality rating
- Annotate the data class with @Entity, and name the table daily_sleep_quality_table
- Identify the nightId as the primary key by annotating it with @PrimaryKey, and set the autoGenerate parameter to true:
- Annotate the remaining properties with @ColumnInfo and customize their names as shown below.
- Build and run your code to make sure it has no errors.
DAO - SleepDatabaseDao
- Create an interface SleepDatabaseDao and annotate it with @Dao
- Add an @Insert annotation, and an insert() function that takes one SleepNight.
- In the same way, add an @Update annotation with an update() function for one SleepNight
- Add a @Query annotation with a function get() that takes a Long key argument and returns a nullable SleepNight
- Add a parameter to @Query.
- Add another @Query with a clear() function and a SQLite query to delete everything from the daily_sleep_quality_table
- Add a @Query to getAllNights()
- Add a @Query to getTonight(). Make the returned SleepNight nullable, so that it can handle if the table is empty.
- Run your app to make sure it has no errors.
Creating a Room Database
- In SleepDatabase.kt, create an abstract class that extends RoomDatabase.
- Declare an abstract value that returns the SleepDatabaseDao
- Below, define a companion object
- Inside the companion object, declare a private nullable variable INSTANCE for the database.
- Below, still inside the companion object, define the getInstance()method with a Context parameter, which will return a reference to the SleepDatabase:
- Inside getInstance() add a synchronized{} block, and pass in this
- Inside the synchronized block, copy the current value of INSTANCE to a local variable, instance
- At the end of the synchronized block, still inside the block, return instance
- Above the return statement, check if there is already a database stored in instance.
- Invoke Room’s databaseBuilder and supply the context that we passed in, the database class, and a name for the database
- Add the required migration strategy to the builder
- And call .build():
- Assign INSTANCE = instance as the final step inside the if statement
- Your final code should look like this
- Build and run your code to make sure there are no basic errors.
Testing the Room Database
- Use the solution code from the previous exercise, which you can download here: Step.03-Solution-Create-RoomDatabase. Work from that code, or copy the test file to your code.
- In the androidTest folder, open the SleepDatabaseTest file.
- Uncomment the code.
- Right-click on the test file in the Project view and choose Run.
- After the app builds and runs, verify in the SleepDatabaseTest pane that all the tests have passed.
Adding a ViewModel
- In the sleeptracker package, open SleepTrackerViewModel.kt.
- Inspect the provided SleepTrackerViewModel class definition that extends AndroidViewModel().
- In the sleeptracker package, open SleepTrackerViewModelFactory.kt
- In the body of create(), we check that there is a SleepTrackerViewModel class available, and if there is, return an instance of it. Otherwise, we throw an exception.
- In the SleepTrackerFragment, in onCreateView(), get a reference to the application context
- Define a dataSource.
- Create an instance of the viewModelFactory.
- Get a reference to the SleepTrackerViewModel
- Your finished code in the SleepTrackerFragment should look like this
- In SleepTrackerFragment inside onCreateView()
- In fragment_sleep_tracker.xml
- In SleepTrackerFragment inside onCreateView()
- Finally, as always, make sure your code builds and runs without errors.
Coroutines for Long-running Operations
- Open the SleepTrackerViewModel.kt file.
- Define viewModelJob and assign it an instance of Job
- Override onCleared() and cancel all coroutines.
- Define a uiScope for the coroutines
- Define a variable, tonight, to hold the current night, and make it MutableLiveData
- Define a variable, nights. Then getAllNights() from the database and assign to the nights variable
- To initialize the tonight variable, create an init block and call initializeTonight(), which you'll define in the next step
- Implement initializeTonight(). In the uiScope, launch a coroutine.
- Implement getTonightFromDatabase(). Define is as a private suspend function that returns a nullable SleepNight, if there is no current started sleepNight.
- Inside the function body, return the result from a coroutine that runs in the Dispatchers.IO context:
- Let the coroutine get tonight from the database. If the start and end times are the not the same, meaning, the night has already been completed, return null. Otherwise, return night
- Implement onStartTracking(), the click handler for the Start button
- Inside onStartTracking(), launch a coroutine in uiScope
- Inside the coroutine, create a new SleepNight, which captures the current time as the start time
- Call insert() to insert it into the database. You will define insert() shortly
- Set tonight to the new night
- Define insert() as a private suspend function that takes a SleepNight as its argument
- For the body of insert(), launch a coroutine in the IO context and insert the night into the database
Add Click Handlers for the Buttons
- Add onStopTracking() to the view model. Launch a coroutine in the uiScope.
- Implement update() using the same pattern as insert()
- Analogously, implement onClear() and clear()
- Open fragment_sleep_tracker.xml and add click handlers to the three buttons
Display the data
- Add code to transform nights into a nightsString using the formatNights() function from Util.kt:
- In fragment_sleep_tracker.xml, in the TextView, in the android:text property, replace the resource string with a reference to nightsString
- In Util.kt and uncomment the commented code.
- Rebuild and run your code.
Recording Sleep Quality
- Inspect the provided SleepQualityFragment.kt.
- Inspect the provided fragment_sleep_quality.xml.
- Open navigation.xml and inspect the code.
- Open SleepTrackerViewModel.kt.
- In SleepTrackerViewModel.kt, in onStopTracking() set a LiveData that changes when you want to navigate.
- Add a doneNavigating() function that resets the event.
- In the click handler for the STOP button, onStopTracking(), trigger this navigation
- In the SleepTrackerFragment, in onCreateView(), add an observer for navigateToSleepQuality.
- Inside the observer block, navigate and pass along the ID of the current night, and then call doneNavigating()
- Build and run your app. Click START, then click STOP, which should take you to the SleepQualityFragment screen.
Record the Sleep Quality
- In the sleepquality package, open SleepQualityViewModel.kt.
- Create a SleepQualityViewModel that takes sleepNightKey and database as arguments
- Define a Job, uiScope, and override onCleared(), as previously
- To navigate back to the SleepTrackerFragment, analogously implement navigateToSleepTracker and _navigateToSleepTracker, as well as doneNavigating()
- Now, create one click handler that you will use for all the smiley sleep quality images, onSetSleepQuality().
- Create a SleepQualityViewModelFactory.
- Open SleepQualityFragment.
- Get the arguments
- Get the dataSource
- And create a factory passing in the dataSource and sleepNightKey
- Get a SleepQualityViewModel reference:
- Add the sleepQualityViewModel to the binding object
- And add the observer, as before
- Open fragment_sleep_quality.xml and add a variable for the SleepQualityViewModel to the block
- Add a click handler like the one below to each image
- Clear cache, rebuild your app, and make sure it runs without errors.
Button States and SnackBar
- Open fragment_sleep_tracker.xml.
- Add the enabled property to each button, and give it the value of a state variable
- Open SleepTrackerViewModel.kt and create three corresponding variables.
- Run your app, and that's all there is to it!
Snackbar
- In the SleepTrackerViewModel, create the encapsulated event
- Then implement doneShowingSnackbar()
- In the SleepTrackerFragment, add an observer
- Display the snackbar and immediately reset the event
- To trigger the event, in onClear(), set the event value to true
- Build and run your app!
